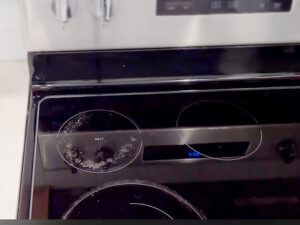
Cleaning a dirty oven may not be the most exciting task, but it’s definitely necessary to keep a clean kitchen. Many people have high hopes for the Aqualift self-cleaning technology, expecting it to make cleaning a breeze. However, it often fails to meet these expectations. If you’re dealing with a disappointing Aqualift performance, it’s understandable to feel frustrated and unsure about finding a good cleaning solution. Don’t worry, there are other methods available that can help you achieve the sparkling results you’re looking for.
When trying to achieve a really clean oven, it’s important to consider and explore different cleaning techniques. There are so many options available when it comes to cleaning, from traditional baking soda and vinegar hacks to newer, more innovative natural cleansers. In this blog post, we explore the challenges and solutions of cleaning ovens. We’ll share some proven methods that don’t rely on Aqualift’s assistance. Say goodbye to tough grease and dirt, because we’re about to embark on a mission to bring your oven back to its original shine.
How to Clean Oven When Aqualift Doesn’t Work
Cleaning an oven can feel overwhelming, especially if the standard self-cleaning feature, like AquaLift, isn’t doing the job effectively. But don’t worry, even without AquaLift, you can still get your oven sparkling clean by following a step-by-step process and using the right tools. Sure, I can provide you with a detailed step-by-step guide on how to clean an oven when AquaLift doesn’t work.

Make sure you have all the necessary supplies
Before you start cleaning your oven, make sure you have all the supplies you need ready. To protect your hands, make sure to grab a pair of durable rubber gloves. Additionally, have a scrubbing brush or sponge handy for those tough stains that need some extra attention. Also, make sure you have a plastic scraper on hand to gently remove any dried residues from the oven without causing any damage to its surfaces.
When it comes to cleaning, you can use the effectiveness of baking soda and white vinegar. Baking soda is a great natural abrasive that can effectively break down grime and grease. On the other hand, white vinegar’s acidity is helpful in dissolving tough deposits. Make sure you have a box of baking soda, a bottle of white vinegar, and a spray bottle handy for easy application.
To make sure you have what you need for wiping and drying, it’s a good idea to have some microfiber cloths readily available. These clothes are really great at picking up residue and they leave surfaces streak-free. Make sure you have a bowl, dish soap, and warm water prepared so you can create your cleaning solutions.
Always keep in mind that safety is extremely important. Make sure the oven has completely cooled down before you begin, and work in a place with good ventilation.
Take out the oven racks
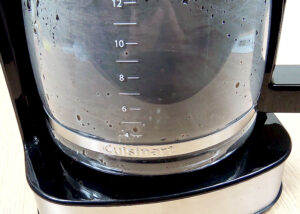
Start by taking out the oven racks. Over time, these shelves can gather quite a bit of dirt and grime. You can put them in a sink or bathtub and fill it up with warm water. To make a soapy solution, simply add a few drops of dish soap. While you clean the inside of the oven, you can let the racks soak. Soaking the item will make it easier to scrub off the grease and dirt later.
Create a paste using baking soda
To make a paste, combine about 1/2 cup of baking soda with a few tablespoons of water in a bowl. The objective is to make a paste that is thick yet easy to spread. Baking soda is a gentle abrasive that effectively breaks down grime without scratching the surfaces of your oven. You can modify the amounts of baking soda and water until you get the paste consistency you want.
Apply the baking soda paste
Make sure to put on your rubber gloves before you continue with this step. Use a gloved hand to evenly spread the baking soda paste on all the interior surfaces of the oven. Make sure to give extra attention to areas that have a lot of grease and residue buildup. Make sure not to put the paste on any heating elements or the fan in the oven. After you have spread the paste evenly, let it sit for a long time. It would be best to let it sit overnight or for a minimum of 12 hours. While you wait, the baking soda paste will do its thing, breaking down and softening the grime.
Scrape off the paste
Once the waiting period is over, you can put on your rubber gloves again. You can use a plastic scraper to gently remove the dried baking soda paste. Doing this should help remove a large amount of the loosened grease and dirt. Please be careful not to scratch the surfaces while you are scraping.
Create a vinegar solution
Now, it’s time for you to create your vinegar solution. To make a simple cleaning solution, combine an equal amount of white vinegar and water in a spray bottle. Vinegar is a great natural cleaner because it’s acidic, which helps dissolve tough residues.
Spray and Wipe
Make sure to spray the vinegar solution all over the inside of the oven, covering it thoroughly. Make sure to focus on the areas where there is still residue, and make sure that the solution covers all of the surfaces. When you spray, you might observe a gentle fizzing reaction. That’s completely normal and a good sign that the vinegar is doing its job to break down any leftover dirt.
Let the vinegar solution sit for approximately 15 minutes. As time goes on, the acidity of the substance will keep working to loosen the dirt. Once the waiting period is over, you can use a damp sponge or scrubbing brush to gently scrub the surfaces. When you combine the acidity of the vinegar with your scrubbing, it should help loosen up the remaining dirt.
If you’re dealing with really tough stains, you can try adding a little bit of baking soda to the scrubbing tool. Baking soda’s abrasive quality gives it an added boost in scrubbing power, while still being gentle on surfaces.
Repeat the process by rinsing again
After you finish scrubbing, grab a clean microfiber cloth that’s slightly damp and use it to wipe down the inside of the oven. This step is important because it ensures that any leftover residue from using baking soda and vinegar for cleaning is completely removed. If you still see any stubborn spots that haven’t gone away, feel free to spray vinegar again and scrub until the surfaces are clean to your satisfaction.
Clean the oven racks
While you were busy working on the inside of the oven, I took care of the oven racks by letting them soak in warm, soapy water. The soaking process will help loosen the grease and grime that has stuck to them. To clean the racks, grab a scrubbing brush or sponge and give them a good, thorough scrub. Make sure to carefully inspect all the small and hidden areas, making sure that there is no leftover residue on any surface.
Rinse and Dry
Once you have finished scrubbing the racks, make sure to rinse them thoroughly under running water. This will help to remove any remaining soap residue. After you finish rinsing, use a clean cloth to dry the racks. Making sure to dry items thoroughly after use can help prevent them from rusting.
Wipe down the interior surfaces
Go back inside the oven. Grab a fresh microfiber cloth that’s slightly damp and use it to give all the surfaces another wipe down. The final wipe makes sure that all the cleaning agents are completely removed, so the inside looks super clean and shiny.
Clean the oven door
Make sure to remember to clean the oven door since it’s one of the most noticeable components of the appliance. To make a soapy solution, simply combine a little bit of dish soap with warm water. To clean the outside of the door, you can use a soft sponge and gently scrub away any fingerprints, stains, or splatters. To prevent streaks, make sure to dry the door with a clean cloth after cleaning it.
Put everything back together and give it a test run
Now that you’ve cleaned the inside of the oven and the door, it’s time to put the oven racks back in place. Please make sure to place them back into their correct positions with care. Make sure that you securely place each rack to avoid any accidents while cooking. Before you start cooking with the oven, it’s a good idea to do a quick test to ensure that it’s working properly.
Performing regular maintenance
To keep your oven clean and working well, it’s a good idea to establish a routine for regular maintenance. Remember to wipe down the inside of the oven after each use to clean up any spills or food residue. If you put a baking sheet on the bottom rack, it can catch any spills and make them easier to clean up right away.
If you carefully follow these detailed steps and pay close attention to each aspect of the cleaning process, you’ll be able to achieve a sparkling clean oven without relying on AquaLift or any other self-cleaning features. Just a friendly reminder that being patient and thorough is really important when it comes to cleaning and getting your oven back to its best condition.
Alternative Ways to Clean Your Oven When AquaLift Doesn’t Work
If the AquaLift self-cleaning feature of your oven isn’t giving you the results you want, there are other methods you can try to get your appliance thoroughly clean. Here are a few different ways you can approach this:
Steam Cleaning
Steam cleaning is a really effective way to get rid of tough dirt and grease. It uses steam to make the grime and grease easier to remove. To get started, you’ll want to grab a heat-resistant bowl and fill it up with water. Then, carefully place the bowl inside the oven. You should preheat the oven to a low temperature, approximately 250°F (120°C). When the water gets hot, it creates steam that moves around in the oven. This helps to loosen any residue that has baked onto the surfaces.
Once the oven has been on for approximately 20-30 minutes, you can go ahead and turn it off. Give it some time to cool down a bit before proceeding. When it’s safe, put on your rubber gloves and use a damp cloth or sponge to wipe away the dirt that has been softened. If you encounter stubborn stains, you can try using a plastic scraper with gentle pressure. Using a combination of steam and physically wiping should be effective in removing the majority of the residue. To complete the task, use a damp microfiber cloth to wipe down the interior.
Commercial Oven Cleaners
Commercial oven cleaners are designed specifically to tackle the challenge of removing stubborn oven grease and baked-on residue. When you’re selecting a commercial cleaner, it’s a good idea to go for one that has a formula that is non-toxic and doesn’t produce any fumes. Make sure to always read and follow the instructions and safety precautions provided by the manufacturer.
Make sure your oven is cool and well-ventilated before using a commercial cleaner. You should spray the cleaner onto the interior surfaces, especially in areas where there is a lot of buildup. Make sure to let the cleaner sit for the recommended amount of time, which is typically about 15 to 20 minutes. During this period, the cleaner will be actively working to break down the dirt and grime. After that, you can grab a scrubbing brush or sponge and start scrubbing to remove the residue. To make sure the oven is clean, use a damp cloth to wipe down the inside, making sure to remove any leftover cleaner.
Natural Citrus Cleaner
Citrus fruits have natural acids that can effectively break down grease and grime. To make a natural cleaner, simply mix lemon juice and water in equal amounts in a spray bottle. Lemon juice is great for cleaning and it also leaves your oven smelling fresh.
Make sure to spray the citrus cleaner all over the inside of the oven, especially in areas where there is a lot of buildup. Let the solution sit for approximately 15 minutes. The natural acids can assist in loosening the dirt. To remove the residue, you can use a scrubbing brush or sponge. Scrub the affected area, and then wipe down the inside with a damp cloth.
Baking Soda and Hydrogen Peroxide
When you mix hydrogen peroxide with baking soda, it forms a strong paste that is really effective at removing stubborn oven grime. To begin, take out the oven racks and let them soak in a basin of warm, soapy water. To make a paste, simply combine baking soda and hydrogen peroxide in a bowl. The consistency of the paste should be thick enough to stick to the surfaces, but not too watery.
Take the paste and apply it evenly inside the oven, making sure to avoid the heating elements. Let it sit for a few hours or overnight. If you mix baking soda and hydrogen peroxide, it can help remove the dirt and grime. Once the waiting period is over, you can scrub the interior using a scrubbing brush or sponge. When you scrub, you’ll see that the residue is coming off. To remove any remaining paste, use a damp cloth to wipe down the surfaces.
Enzyme-based Cleaners
Enzyme-based cleaners are specifically made to break down organic matter, which makes them a great choice for dealing with oven residue. Please search for enzyme cleaners that are specifically made for cleaning ovens. These cleaners have enzymes that specifically focus on breaking down and getting rid of grease and dirt.
Please follow the instructions provided by the manufacturer when applying the enzyme-based cleaner. Make sure to let it sit for the recommended time so that the enzymes have enough time to work their magic. Next, use a scrubbing brush or sponge to clean the interior and remove any loosened residue. After you’re done, use a damp cloth to wipe down the interior and make sure there’s no residue left from the cleaner.
Tips to Keep Your Oven Clean and Prevent Buildup
Keeping your oven clean is important for both cooking delicious meals and making sure your appliance lasts as long as possible. To keep your oven in great shape and reduce the need for deep cleaning, try following these helpful tips.
Using Oven Liners
Investing in oven liners is a great idea because they can help you avoid those annoying spills and drips that often lead to stubborn stains. You can use these liners, which are made of materials that can withstand high temperatures, by placing them on the bottom rack of your oven. They will catch any food or liquid that might spill over while you’re cooking. You can easily remove and clean them, which will help prevent any buildup in your oven.
Cover your food while it’s cooking
When you cover your dishes while cooking, it can really help prevent food from splattering and spilling inside the oven. By using this method, you can prevent a mess from happening right away and also reduce the likelihood of those splatters getting baked onto the surfaces of the oven, which can make them difficult to clean later on. You might want to think about using covers or lids that are safe to use in the microwave and fit your cookware that is also safe to use in the oven.
Cleaning up spills on a regular basis
Even if you use liners and cover your dishes, spills can still happen from time to time. The important thing is to clean them up right away. Once your oven has cooled down after cooking, you can safely touch it. Grab a damp cloth and use it to wipe away any spills or residues that you can see. By taking a proactive approach, you can prevent spills from baking onto the surfaces of your oven, which will make them much easier to clean later on.
Use baking sheets and pans for baking
If you’re baking or roasting foods that tend to drip, like casseroles or roasted meats, it’s a good idea to place them on baking sheets or pans. This not only keeps any drips from touching the oven’s surfaces, but also prevents them from doing so directly. You can clean the baking sheets separately to reduce the chances of grime building up in the oven.
Check the seals regularly and replace them as needed
The door seal is usually made of rubber or silicone and it’s really important because it helps keep the oven’s temperature steady and stops heat from getting out. Seals can wear out or get damaged over time, which can cause heat to escape and possibly result in spills between the glass panels of the door. Make sure to check the seal regularly for any signs of damage or deterioration, and if you notice any issues, be sure to replace it.
Use cookware that is safe to put in the oven
Using the right cookware can really help prevent spills and splatters. When selecting cookware for your oven, make sure to choose pieces that are oven-safe and have lids that fit well to keep your food contained. Choose cookware that has higher sides because it’s less likely to let liquids bubble over. Making this proactive choice can assist in keeping the interior of your oven cleaner.
Clean doors often
When you’re cleaning the inside of your oven, make sure you don’t forget about the oven door. The kitchen is one of the first places where you’ll notice smudges and fingerprints, which can make it look less clean and tidy. To maintain a clean and welcoming appearance, it’s a good idea to regularly clean the door with a damp cloth and mild dish soap.
If you follow these preventive tips, you’ll be able to cut down on how often and how thoroughly you need to clean your oven. If you want to keep your oven clean and in good shape, it’s a good idea to be proactive about it. This will save you time and effort, and ensure that your oven is always ready to cook delicious meals.
Frequently Asked Questions
How frequently should I clean my oven?
How often you clean your oven depends on how much you use it and the kind of food you cook. Typically, people who use their ovens lightly can clean them every 3-6 months. If you bake or roast often, it’s a good idea to clean your oven every 1-2 months. This will help prevent any residue buildup that could impact how well your food cooks and keep any unpleasant odors from lingering.
Is it safe to use a regular household cleaner on my oven?
It is not advisable to use regular household cleaners on your oven. When you clean the inside of an oven, it’s important to be aware that the high temperatures can cause chemical reactions with regular household cleaners. This can result in the release of harmful fumes or leave behind residue that may not be safe. It’s best to use cleaners that are specifically made for ovens or ones that are natural and safe to use in these conditions.
Is it possible to clean the oven racks in the dishwasher?
Although certain oven racks may be labeled as dishwasher-safe, it is important to consult your oven’s manual for specific recommendations. Dishwashers that use high heat and strong water pressure have the potential to impact the durability of the racks. This can result in warping or discoloration of the racks over a period of time.
Could you please provide me with some tips on how to clean oven glass without causing any scratches?
To clean the glass on your oven, it’s important to be gentle so you don’t accidentally scratch it. To start, use a damp cloth to wipe away any loose debris. To make a cleaning solution, you can mix warm water with a gentle dish soap. To clean the glass, you can wet a non-abrasive scrubbing pad or a microfiber cloth with the solution. Then, gently scrub the glass, paying extra attention to any stubborn spots. To prevent streaks, make sure to rinse the surface with clean water and then gently dry it using a soft cloth.
Can I use the self-cleaning feature on my oven without any safety concerns?
Using the self-cleaning feature can be safe if you follow the proper guidelines, but there are a few things to keep in mind. When the process generates a lot of heat, it can cause smoke and potentially trigger smoke detectors. To make sure your kitchen has good ventilation, try opening windows and using fans. Before starting the self-cleaning cycle, make sure to remove any big food particles from your oven. Also, it’s important to never leave your oven unattended while it’s cleaning itself.
Is it possible to clean my oven using vinegar?
Absolutely! White vinegar is an incredibly versatile and effective natural cleaner. The mild acidity of this product assists in breaking down grease and grime. To clean your oven, simply mix an equal amount of white vinegar and water in a spray bottle. Then, generously spray the mixture onto the interior of the oven. You should let it sit for approximately 15 minutes before using a non-abrasive scrubber or sponge to scrub it. Make sure to rinse everything well afterwards so that you don’t have any lingering vinegar smell.
Can you please tell me how to remove burnt-on grease from my oven?
Removing burnt-on grease can be quite difficult, but there’s a handy solution you can try. You can make a paste by combining baking soda and water, which can be really effective in tackling this stubborn grease. You should apply the paste to the affected areas and leave it on overnight. The baking soda will help to break down the grease. The following day, you can use a scrubbing brush or sponge to gently remove the residue. Please rinse and wipe the interior until it is clean.
Is it safe to use steel wool for cleaning my oven?
I would recommend not using steel wool on the surfaces of your oven. Steel wool is rough and can cause scratches on surfaces like enamel or other finishes. This can result in possible rusting or more dirt accumulating. Choose scrubbers, sponges, or brushes that are specifically made for cleaning ovens, and make sure they are non-abrasive.
Is it safe to clean my oven while it’s still warm?
It can be risky to clean your oven while it’s still warm. When temperatures are high, cleaning agents tend to evaporate faster, which makes them less effective. In addition, there is a risk of burning yourself if you come into contact with hot surfaces. Make sure to wait until your oven has completely cooled down before you start cleaning it.
What can I do to avoid unpleasant smells when cleaning my oven?
If you want to reduce any unpleasant smells while cleaning and afterwards, you can try adding a few drops of essential oil like lemon or lavender to your cleaning solution. Not only do essential oils help to cover up chemical odors, but they also leave a nice fragrance in the air.
Do natural oven cleaners work well?
Baking soda and vinegar are great options for cleaning your oven naturally. They work well for light to moderate cleaning and regular upkeep. Baking soda works as a mild scrubbing agent, while vinegar’s acidic properties aid in breaking down grease. If you’re dealing with a lot of buildup or stubborn stains, it might be worth looking into commercial cleaners or degreasers.
Is it possible for me to clean the glass panels on the oven door?
A lot of oven doors have glass panels that can be taken out for cleaning purposes. Please consult the manual for your oven to find instructions on how to safely remove and clean these panels. To clean the glass, you can either use a glass cleaner or make a mixture of vinegar and water. Before putting the panels back together, make sure they are completely dry to avoid any fogging.
Is it safe to use a razor blade for cleaning my oven?
It’s important to be cautious when using a razor blade to clean your oven’s surfaces because there is a risk of scratching the enamel or glass. If you need to use a razor blade, make sure it’s a specialized one that is designed specifically for glass surfaces. Please be cautious when angling it and use it sparingly, specifically on glass surfaces.
Could you please provide me with instructions on how to clean the exterior of an oven?
To clean the outside of the oven, you’ll need a damp cloth and a mixture of warm water and mild dish soap. Please clean the outside surfaces, including the knobs and handles. It’s best to steer clear of using harsh cleaners that could potentially harm the finish. If you have stainless steel exteriors, it’s a good idea to use a specialized stainless steel cleaner to keep them shiny.
Is there a way to avoid smoke when using the self-cleaning function?
To reduce the amount of smoke produced when using the self-cleaning feature, make sure your oven isn’t very dirty before you begin. Please make sure to clean up any food particles or debris that you can see. To ensure good ventilation in your kitchen, you can open the windows and turn on fans. This will help to disperse the smoke effectively. Also, make sure you don’t leave your oven unattended while it’s in the self-cleaning cycle.