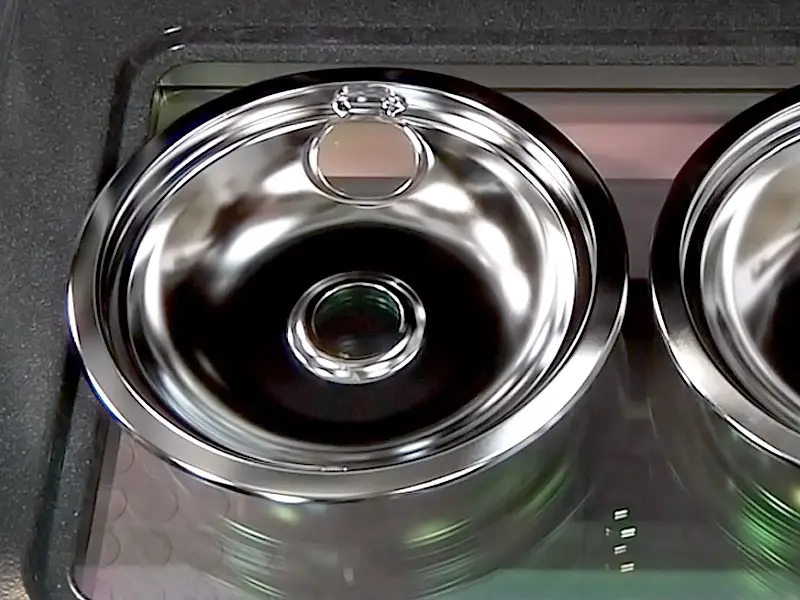
To clean drip pans on an electric stove, remove them and soak in hot, soapy water. Scrub with a non-abrasive sponge before drying and reassembling.
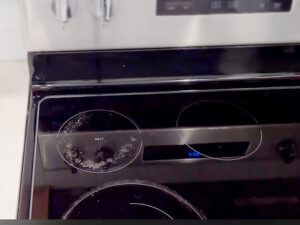
Maintaining a clean electric stove is essential for efficient and safe cooking. One of the areas that often require regular cleaning are the drip pans. Over time, these pans can accumulate grease, food residue, and other dirt, affecting the appearance and functionality of the stove.
Fortunately, cleaning drip pans is a relatively simple task that can be done with basic household items. We will provide an easy-to-follow guide on how to effectively clean the drip pans on your electric stove, ensuring a pristine and well-maintained cooking appliance for your daily use.
Understanding Drip Pans
To effectively clean drip pans on an electric stove, start by removing the pans and soaking them in hot soapy water. Use a scrub brush to remove any baked-on food residue, rinse the pans thoroughly, and let them dry completely before placing them back on the stove.
Drip pans are essential components of an electric stove that help to catch drips, spills, and debris from cooking. Proper maintenance of these pans is crucial in ensuring the cleanliness and efficiency of your stove. Understanding how drip pans work and the best methods for cleaning them is important for keeping your stove in top condition.
Below, we’ll explore the significance of drip pans and provide effective tips for cleaning them.
Importance Of Drip Pans
- Drip pans prevent spills and food debris from reaching the heating elements, which can cause smoke and unpleasant odors during cooking.
- These pans help in the efficient and safe operation of the electric stove, promoting a longer lifespan for the appliance.
Tips For Cleaning Drip Pans
- Regularly remove and soak the drip pans in warm, soapy water to loosen stubborn residue before cleaning.
- Use a non-abrasive sponge or cloth to scrub the drip pans, ensuring all grease and food particles are removed.
- For tough stains, apply a mixture of baking soda and water to help break down the grime before scrubbing.
It’s important to understand the role of drip pans in maintaining the cleanliness and efficiency of your electric stove. By following the tips provided, you can ensure that your drip pans are effectively cleaned, contributing to the overall functionality of your stove.
Tools And Materials Needed
To clean drip pans on an electric stove, gather tools and materials such as hot water, dish soap, baking soda, vinegar, scrub brush, and gloves. These items will effectively remove grime and grease, leaving the drip pans sparkling clean.
When it comes to cleaning the drip pans on an electric stove, having the right tools and materials is key to achieving a sparkling clean result. Here’s what you’ll need to get started:
- Baking soda: This household staple is an effective cleaning agent, especially for tackling tough stains and grease buildup on drip pans.
- White vinegar: Its acidic properties make it great for cutting through grime and lifting stubborn residue.
- Dish soap: A gentle yet powerful dish soap will help to remove surface dirt and prepare the drip pans for a deeper clean.
- Scrub brush or sponge: A sturdy scrub brush or sponge will aid in loosening and removing debris from the drip pans without causing damage.
- Ziplock bags: These will come in handy for soaking the drip pans in a cleaning solution, allowing for easy and mess-free cleaning.
- Rubber gloves: Protect your hands from harsh cleaning agents and dirt with a pair of durable rubber gloves.
- Old toothbrush: This small tool is perfect for targeting hard-to-reach areas and crevices on the drip pans.
Ensure you have these tools and materials on hand before beginning the cleaning process. They will make the task much easier and more efficient.
Safety Precautions
When cleaning drip pans on an electric stove, it’s important to take safety precautions into account. Start by unplugging the stove to avoid any electrical mishaps. Additionally, use protective gloves and consider using natural cleaning solutions to minimize exposure to harsh chemicals.
When it comes to cleaning drip pans on an electric stove, safety should always be the top priority. Here are some essential safety precautions to keep in mind before you start cleaning:
- Turn off the Power: First and foremost, switch off the power supply to the stove to prevent any electrical accidents.
- Allow Cooling Time: Wait for the drip pans to cool down before handling them to avoid burns or injuries.
- Use Protective Gear: Wear protective gloves and goggles to shield your hands and eyes from any cleaning chemicals or grease.
- Ventilation is Key: Ensure proper ventilation by opening windows or using a fan to avoid inhaling fumes from cleaning products.
- Clear the Workspace: Remove any flammable items around the stove area to prevent fire hazards during the cleaning process.
Remember that taking necessary safety measures is crucial to ensure a risk-free cleaning experience for your electric stove’s drip pans.
Step-by-step Cleaning Process
A dirty drip pan not only looks bad but can also make the stove work less well. In this guide, we will show you how to clean your electric stove’s drip pans in a simple step-by-step process.
Remove Drip Pans from an Electric Stove
When cleaning a kitchen appliance, especially one that uses electricity, it’s important to prioritize safety above all else. Make sure to turn off the stove and let it cool down before you begin cleaning. When you are sure it’s safe, carefully remove the burners from their sockets. Electric stoves usually have removable burners, making it simple to access the drip pans underneath.
Getting Ready to Make a Cleaning Solution
Choosing the right cleaning solution is important for effectively cleaning the drip pan. You have a few choices. A simple and effective solution is to combine warm water with a few drops of dish soap. You can also make a paste by mixing baking soda and water. This baking soda paste is great for removing tough stains and grease buildup.
Soaking the Drip Pans
Soaking the drip pans is an important part of cleaning. Put the drip pans in a basin or sink and apply your chosen cleaning solution generously. Let the pans soak for 15 to 20 minutes. Soaking the item helps loosen dirt, making it easier to clean later.
Scrubbing and Cleaning
After the soaking is done, it’s time to get ready and start scrubbing. To clean the drip pans, simply use a scrubbing brush or sponge on the surface. Make sure to focus on areas that have tough stains or residue that is burnt-on. Soaking and scrubbing together will help make these tough spots easier to handle.
To remove tough stains, try using an old toothbrush to reach small and tight areas. The aim is to make sure your drip pans are clean and shiny, with no leftover dirt.
Rinsing and Drying
Once you finish scrubbing, it’s time to rinse the drip pans to get rid of any leftover cleaning solution. To remove the soap or baking soda residue, simply use clean water and a sponge or cloth to wipe it away. Make sure to thoroughly rinse off all cleaning products.
After washing, make sure to completely dry the drip pans before putting them back in the electric stove. This step is very important to keep the stove’s electrical parts safe from any moisture. To dry the drip pans, you can use either a towel or paper towels. Just make sure they are completely dry before putting them back in.
Reassembling the Stove
Now that your drip pans are clean and dry, it’s time to reassemble everything. Carefully put the burners back into their proper sockets, making sure they fit securely. Take a moment to look at your clean drip pans and appreciate how they have been transformed. Please, turn the stove on again and appreciate how well it works now.
By following this simple cleaning process, you can make your electric stove look great and help it last longer and work more efficiently. Keeping your kitchen clean and functional is important. Regular maintenance, like cleaning drip pans, doesn’t take much time but is worth it in the end.

Tips For Maintaining Clean Drip Pans
To maintain clean drip pans on an electric stove, start by removing the pans and soaking them in a mixture of hot water and dish soap. Scrub the pans with a sponge or brush to remove built-up grime. For tougher stains, use a paste of baking soda and water, apply it to the pans, and let it sit before scrubbing.
Beneath the heating elements of your electric stove, drip pans gather grease, food spills, and crumbs over time. Proper maintenance ensures they remain clean and functioning optimally, preventing potential fire hazards and enhancing the overall appearance of your kitchen. Here are some essential tips to keep your drip pans in top condition:
- Regular Cleaning: To prevent the buildup of grease and food residues, it’s important to clean the drip pans regularly. Wipe them down with a soapy sponge or use a mixture of baking soda and water to remove stubborn stains and grease.
- Use Aluminum Foil: Placing aluminum foil on the drip pans can make cleanup easier. Simply replace the foil when it becomes dirty or stained.
- Soak in Hot Water and Dish Soap: For deep cleaning, remove the drip pans and soak them in hot water and dish soap for a few hours. This can help in loosening tough stains and making it easier to scrub off the grime.
- Avoid Harsh Cleaners: Refrain from using harsh chemicals or abrasive cleaners on the drip pans as they can damage the surface. Opt for gentle cleaning solutions to maintain the integrity of the drip pans.
- Inspect and Replace: Periodically inspect the drip pans for any signs of damage or excessive wear. If they are beyond cleaning, consider replacing them to ensure optimal stove performance.
By following these simple yet effective maintenance tips, you can ensure that your electric stove’s drip pans remain clean and in good condition, enhancing the functionality and appearance of your kitchen.
Troubleshooting
To clean drip pans on an electric stove, start by removing the pans and soaking them in hot, soapy water. Scrub away any built-up residue using a mixture of baking soda and vinegar, then rinse and dry thoroughly before replacing them.
When it comes to cleaning the drip pans on an electric stove, troubleshooting can help you tackle any stubborn stains and buildup. Here are the key troubleshooting tips to ensure your drip pans are spotless:
- Use baking soda: Sprinkle baking soda over the drip pans and let it sit for 15-20 minutes. This will help to loosen the grime and make it easier to scrub away.
- Soak in vinegar: In a shallow container, create a mixture of equal parts vinegar and hot water. Soak the drip pans in this solution for an hour to break down tough stains.
- Scrub with a toothbrush: Use an old toothbrush to scrub the drip pans, focusing on the grooves and crevices to remove any remaining residue.
- Replace if necessary: If the drip pans are heavily corroded or damaged, it’s best to replace them with new ones to ensure proper stove functionality.
Troubleshooting these common issues will help you maintain a clean and efficient electric stove, ensuring that your cooking experience is hassle-free. Remember, regular cleaning and maintenance will prolong the lifespan of your electric stove and keep it looking like new.
Conclusion
Maintaining clean drip pans on your electric stove is essential for efficient cooking. Regular cleaning prevents residue buildup and ensures even heat distribution. With just a few simple steps, you can keep your stove looking and functioning its best. Remember to clean the drip pans regularly to enhance the longevity of your electric stove.