As an experienced homeowner who has personally dealt with the frustration of fighting bathroom mold, I understand the struggles associated with dealing with stubborn mold growth. Caulk that is moldy can be unsightly, but it also poses health risks and compromises the integrity of your bath. Fear not! I’ve learned from countless mistakes and honed skills to restore caulking back to its original pristine state. This blog post will provide you with my experience and step-by-step instructions on how to remove caulk from your bathroom. With these tried and true methods, you can say goodbye to the moldy caulk in your bathroom and hello to a clean, fresh one. Learn how to clean caulking in the bathroom.
Bathroom mold: Understanding and assessing the enemy
When it comes to combating bathroom mold, understanding the enemy is key. The first step to effective mold removal is to identify and assess the type and severity of mold growth. In a moist bathroom environment, different types of molds can flourish. These include common molds like black mold (Stachybotrys), green molds (Aspergillus), or pink molds (Serratia marcescent).
For mold identification, inspect the caulking and look out for signs like black or green spots, and fuzzy or discolored growth, or discoloration. Mold can also be detected by a musty smell. You should also assess the extent of the mold colony. Larger or more extensive colonies may require aggressive cleaning.
It is important to assess the health risks that mold may pose. Certain types of mold release spores which can cause allergies, respiratory problems, or other health issues in susceptible individuals. You should take extra precautions if you suffer from respiratory problems or allergies. Consider hiring a professional to remove mold.
To conclude, the first step to conquering bathroom mold is to identify and assess the type and severity. Identification and assessment of the mold will allow you to determine the best cleaning methods and preventative measures, leading to a mold-free, healthy bathroom.
To Effectively Clean Mold, You Need to Gather Your Weaponry: The Right Tools and Supplies
It is important to have the right equipment and supplies for a mold-free bathroom. Here are some items you should have in your arsenal.
- Protective Gear: Wear gloves, goggles, and a mask before you begin cleaning. Mold spores are harmful if inhaled, or if they come into contact with your skin. Taking precautions is important.
- Cleaning Solutions: Various cleaning solutions can be used to remove mold from bathroom caulking. These include bleach, hydrogen peroxide, and commercial mold cleaners. Choose the best cleaning solution for your needs and preferences.
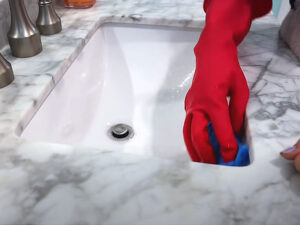
- Scrubbing Tools: You will need tools to scrub the mold from the caulking. Brushes or brushes with soft bristles can be used to gently scrub the caulking without damaging it or the surrounding area.
- Sealants: Applying a mold-resistant caulk after cleaning can prevent future mold growth. Search for caulks that are mold-resistant or silicone-based and specifically designed for bathrooms.
- Clean, Dry Cloth or Towels: After scrubbing, it is important to have a clean and dry towel or cloth on hand. This will help you remove excess moisture from the caulking. By thoroughly drying the area, you can prevent mold growth due to moisture.
You’ll be better equipped to clean caulking and mold in the bathroom by assembling the necessary tools and supplies. Always follow the instructions on any cleaning solution and use appropriate safety precautions during the cleaning process.
Battle Plan: Step-by-Step Techniques for Cleaning Caulking Mold
A step-by-step approach can help you to be more effective and efficient when it comes time to fight bathroom caulking mold. Use these methods to remove caulking and return your bathroom to its original, clean condition.
Step 1: Prepare the Area for Cleaning
To get the best results, you should prepare the area for cleaning before starting. What you should do is:
- Ventilate your Bathroom: Open the windows and use fans to increase ventilation. Proper ventilation can help reduce the concentration of spores and mold in the air.
- Protect Yourself: Wear protective gear such as gloves, goggles and a face mask to protect yourself from mold spores or cleaning solution fumes.
- Remove any loose debris: Use a brush or a scraper to remove any loose particles, such as caulking that is moldy or grime.
Step 2: Select and Apply a Cleansing Solution
Next, choose a mold-fighting cleaning solution. You have several options to choose from:
- Bleach Solution: In a spray bottle, mix one part bleach with three parts water. Spray the solution on the caulking that is moldy and allow it to sit for 10 to 15 minutes. This will allow the bleach to penetrate the caulking to kill the mold.
- Vinegar solution: In a spray bottle, mix equal parts of white distilled vinegar and water. Spray the solution on the caulking that is moldy and allow it to sit for an hour. Vinegar is a natural antifungal that can kill mold.
- Hydrogen peroxide Solution: In a spray bottle, mix equal parts hydrogen peroxide with water. Spray the solution on the caulking that is moldy and allow it to sit for 10-15 minutes. Hydrogen peroxide, a disinfectant natural, can kill mold.
- Commercial Mold Cleaner: If you choose to use a mold cleaner commercially, please follow the instructions provided by the manufacturer. Choose a mold-removal product that has been formulated specifically for caulking and is safe to use.
Apply the cleaning solution to the caulking that is moldy and make sure it covers the entire area. Use abrasive or excessively forceful materials to avoid damaging the caulking and the surface.
Step 3: Scrub Moldy Caulking
Use a soft bristled brush or toothbrush to gently scrub moldy caulking after allowing the cleaning solution to sit as recommended. Focusing on the moldy spots, scrub in circular motions until the mold has been removed.
Continue to scrub the caulking until it appears free of mold and stains. Avoid sharp objects and abrasive substances that could scratch or damage caulking.
Step 4: Rinse the Area and Dry it
Once you have thoroughly scrubbed away the moldy caulking with a clean cloth or sponge, rinse and dry the area to remove any cleaning solution that may still be present. Wipe down the caulking with a damp, clean cloth or sponge.
Then, dry the area with a towel or a cloth. Mold grows in damp environments. It is therefore important to make sure that the caulking has dried completely to avoid mold.
Step 5: Apply Mold-Resistant Caulk
To prevent further mold growth, apply a mold-resistant sealant. Follow the instructions provided by the manufacturer when applying a mold-resistant or silicone-based caulk designed specifically for bathrooms.
Sealant should be applied to the caulking after it has been cleaned and dried. Make sure that the sealant covers the entire area, creating a waterproof barrier. This will prevent moisture from seeping through the caulking, creating conditions that are conducive to mold growth.
Step 6: Regular Maintenance & Prevention
After you have successfully removed the caulking mold from your bathroom, it is important to maintain regular maintenance and preventative practices to keep mold away. Here are some tips.
- Maintain a well-ventilated bathroom: Proper ventilation will help prevent mold growth. Use exhaust fans or open the windows after and during showers to lower humidity levels.
- Wipe down surfaces regularly: Regularly wipe bathroom surfaces (including caulking) with a towel or a cloth to prevent moisture accumulation and mold growth.
- Address Water Infiltration and Leaks: Repair any leaks in the bathroom or issues with water intrusion immediately to avoid moisture seeping into caulking, creating conditions favorable for mold growth.
- Mold-Inhibiting Cleaning Products: Use mold-inhibiting sprays or cleaners regularly to prevent the growth of mold. These products can be used to prevent the growth of mildew and mold in the bathroom.
- Replace damaged caulking: If you see any cracks or gaps in the caulking replace it immediately to stop water from seeping through and causing mold.
To conclude, cleaning caulking in the bathroom mold effectively requires a battle plan. This includes preparing the surface, selecting and applying the right cleaning solution, scrubbing away the moldy caulking and rinsing, drying and sealing the area. In order to prevent mold from recurring, it is important to maintain regular maintenance and preventative practices.
Winning the war: Preventive measures for long-term mold control
To win the battle against caulking mold in bathrooms, you need not only to use effective cleaning methods but also to take proactive preventive steps for long-term control. Implementing preventive measures can reduce the likelihood of mold regrowth, and help maintain a mold-free bathroom.
Assuring proper ventilation in the restroom is one of the most important preventive measures. Mold growth is primarily caused by moisture, so you should keep the humidity low. Open windows or use exhaust fans to let moist air escape after and during showers. Ensure that your exhaust fan works properly and is cleaned regularly to achieve optimal performance.
Mold growth can also be prevented by regular cleaning and maintenance. To prevent mold growth, wipe down bathroom surfaces including caulking with a towel or dry cloth on a regular schedule. Avoid using abrasive cleaning products that could damage the caulking or create space for mold growth.
It is important to address any water intrusion or leaks as soon as possible in order to prevent mold growth. Look for leaks around pipes or plumbing fixtures or in the shower or bathtub area. You should fix any leaks as soon as possible to avoid water seeping through the caulking, which can lead to mold growth.
Mold-inhibiting sprays and cleaners are also effective as preventive measures. These products contain ingredients that inhibit the growth and spread of mold. They can be used regularly to prevent mold from growing on bathroom surfaces and caulking.
Another preventive measure to help control mold is to inspect and replace damaged caulking regularly. Caulking that has cracks, gaps, or damage can allow water to enter and cause mold. It is important to replace damaged caulking immediately in order for the seal to remain intact and prevent mold.
It’s also important to watch out for signs of mold growth in the caulking around your bathroom. Take immediate action if you detect any mold spots or musty smells. Clean and treat affected areas immediately to prevent further growth.
You can fight bathroom caulking mold by implementing preventive measures and maintaining a well-ventilated and dry bathroom environment. This will ensure that you have a healthy and clean bathroom for a long time. Be proactive in your efforts to prevent mold growth and to maintain a healthy and safe living environment.
Staying Healthy and Safe: Best Practices and Precautions
It’s vital to put safety and health first when dealing with caulking in the bathroom. This will protect you and others. Here are some best practices and precautions to remember:
- Wear Protective Gear: Before beginning the cleaning process, wear protective gear such as goggles, gloves, and a mask to protect your eyes, skin, and respiratory system against mold spores.
- Proper Ventilation: Use exhaust fans or open windows to circulate fresh air and prevent the accumulation of mold spores, cleaning fumes, and other contaminants.
- Use Safe Cleaning Products: Select mold-cleaning products that are effective and safe to use in bathrooms. Avoid bleach and other harsh chemicals, which can cause caulking to be damaged or emit harmful fumes. Use the product according to the instructions provided by the manufacturer and in an area that is well-ventilated.
- Avoid Aggressive Cleaning: Although it is important to thoroughly remove the moldy caulking from the surface, aggressive cleaning can cause damage to the caulking and release mold spores in the air. Clean the mold with non-abrasive materials and gentle scrubbing.
- Dispose of Moldy Material Properly: After cleaning, place any moldy material, such as rags and brushes, into a sealed plastic bag to avoid the spread of mold. Clean your hands thoroughly and any cleaning tools.
- Follow Local Health Guidelines: If you have a persistent or large mold infestation, follow local health guidelines for mold removal. If needed, seek professional help.
- Use Preventive Methods: Take preventive measures such as regular cleaning and ventilation, and repair leaks promptly to avoid future mold growth.
Following these best practices and precautions will ensure your safety and the health of others, while cleaning and preventing caulking in bathroom. Prioritize safety and take the necessary precautions in order to create a healthy and safe environment in your bath.
FAQs
What is the cause of mold growing on caulking in bathrooms?
Bathroom caulking is a perfect breeding ground for mold, as it thrives in humid and damp environments. Mold growth in bathroom caulking is often caused by high humidity levels, inadequate ventilation, leaks of water, and poor cleaning.
How can I identify mold on caulking in the bathroom?
A Mold appears usually as black or green spots, patches, or streaks. The mold may be slimy or fuzzy with a musty smell. Mold is likely to be the cause of any discoloration, or growths that are not normal on bathroom caulk.
How do I remove mold from bathroom caulking using bleach?
Although bleach is effective at killing mold it’s not the best choice for caulking in bathrooms as it could damage it and cause toxic fumes. Use mildew and mold specific cleaners safe to be used on caulking. Follow the instructions provided by the manufacturer.
How frequently should I clean the caulking in my bathroom to avoid mold?
To prevent mold on your bathroom caulking, regular cleaning is essential. Cleaning bathroom caulking is recommended at least every month, or even more often if your bathroom has a lot of moisture or you live in an humid environment. Fix any leaks and address visible mold immediately to stop further growth.
Can I stop mold growing on my bathroom caulking by taking preventive measures?
You can prevent mold from growing on caulking in the bathroom by taking precautions. You can use proper ventilation to prevent mold growth, open windows or exhaust fans for moisture reduction, wipe down the caulking immediately after showers and fix leaks quickly.
Is it possible to use natural remedies for cleaning mold from bathroom caulkings?
There are some natural ways to remove mold from bathroom caulking. As an example, you can use a mixture made of baking soda or white vinegar with water as a mold remover. It’s worth noting that some natural mold cleaners may be less effective than commercial ones and require multiple applications.
What are some preventive measures for bathroom caulking to be mold free?
Ensure proper ventilation. Fix leaks immediately. Use mold resistant caulking. Clean regularly with mold specific cleaners. Mold growth can also be prevented by keeping your bathroom properly ventilated, reducing the humidity level, and encouraging airflow.
Can a caulking sealing agent be used to stop mold from growing on the bathroom caulkings?
Applying a caulking sealing agent can create a barrier to prevent mold from growing on the bathroom caulking. Follow the instructions of the manufacturer to apply mold-resistant caulking sealants designed specifically for bathroom use.
Do I need to hire a professional to clean bathroom caulking mould?
It’s best to hire a professional if you are dealing with a serious or persistent mold problem. Mold remediation professionals have the experience and knowledge to remove caulking from bathrooms safely, effectively, and with minimal damage. A professional will ensure proper cleaning, particularly if there are health issues or extensive mold growth.
Final Thoughts
To tackle bathroom caulking mould, you need to combine effective cleaning methods, safety measures and preventive precautions. You can eliminate bathroom caulking mould by identifying and assessing it, gathering all the necessary tools and materials, following an organized cleaning schedule, and taking preventive measures. It’s crucial to prioritise safety, which means wearing appropriate protective equipment, using only safe cleaning solutions, and adhering to health guidelines. To prevent future mold growth, regular maintenance, adequate ventilation and rapid repair of leaks is key. You can have a healthy and clean bathroom by being consistent and proactive in your efforts to prevent and remove mold.